Hardware synths have made a huge comeback, and few are as inspiring as the Moog Grandmother. With its semi-modular design and classic analog sound, it’s a favorite among producers. But if you want to integrate it into a modern workflow, you need to know how to properly connect it to your DAW.
Whether you’re recording lush analog leads or sequencing patterns from your computer, learning how to connect the Moog Grandmother to a DAW will unlock a powerful hybrid setup.
Don’t want to read? Watch the video instead👇🏻
Table of Contents
Understanding the Signal Flow: What You Need to Get Started
Before diving into cables and settings, it’s important to understand what you’re actually connecting. Unlike fully digital synths, the Moog Grandmother produces analog audio that must be physically recorded into your DAW.
To get started, you’ll need:
- An audio interface (to capture sound)
- A DAW (like Ableton Live, Logic Pro, FL Studio, etc.)
- Audio cables (typically 1/4” TS)
- A USB or MIDI cable (for sending midi notes)
Think of it as two separate paths:
- Audio signal → what you hear
- MIDI signal → what controls the synth
Understanding this distinction is key when learning how to connect Moog Grandmother to a DAW effectively.
Connecting Audio: Capturing the Moog Grandmother’s Sound
The first step is getting sound from your synth into your DAW.
Step 1: Plug in the Audio Output
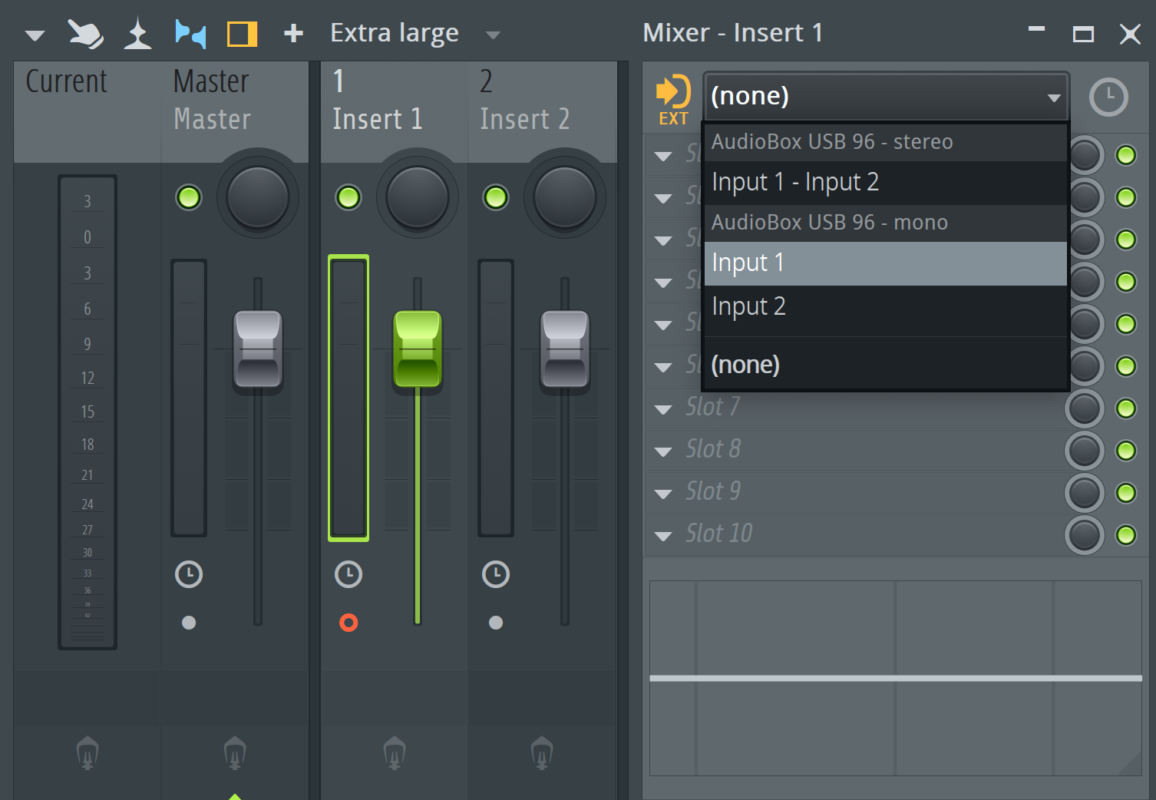
Connect the audio output of the Moog Grandmother to an input on your audio interface using a 1/4” cable.
Step 2: Set Up Your DAW
Open your DAW and:
- Select your audio interface in the audio setting of your DAW
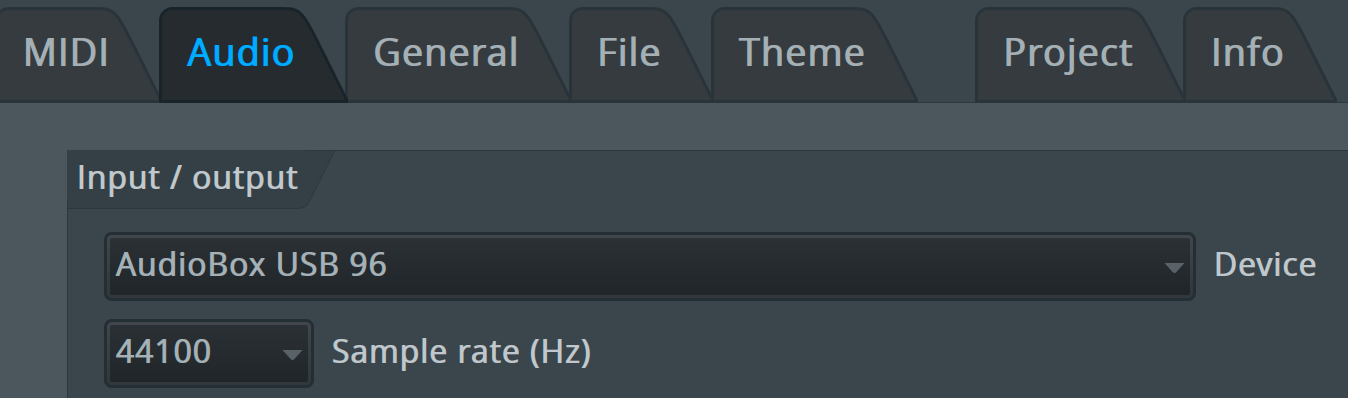
- Select an empty mixer channel
- Select the correct input channel from your interface
- Arm the track for recording
Step 3: Adjust Levels
Play a few notes and monitor the signal. Make sure:
- The input isn’t clipping
- The signal is strong but clean
Once this is done, you’ll be able to record the raw analog sound directly into your project.
Using MIDI: Syncing and Sequencing Your Synth
Now that audio is flowing, it’s time to control the Moog Grandmother from your DAW.
USB vs MIDI DIN
The Moog Grandmother supports both:
- USB MIDI (simplest option)
- 5-pin MIDI DIN (more traditional setup)
For most users, USB is plug-and-play and works instantly with your DAW.
Step 1: Connect MIDI
- Plug the synth into your computer via USB (recommended)
- Or connect MIDI Out from your interface to MIDI In on the synth or MIDI Out from your synth to MIDI In on your interface


Step 2: Configure MIDI in Your DAW
Using Moog Grandmother as a MIDI Keyboard
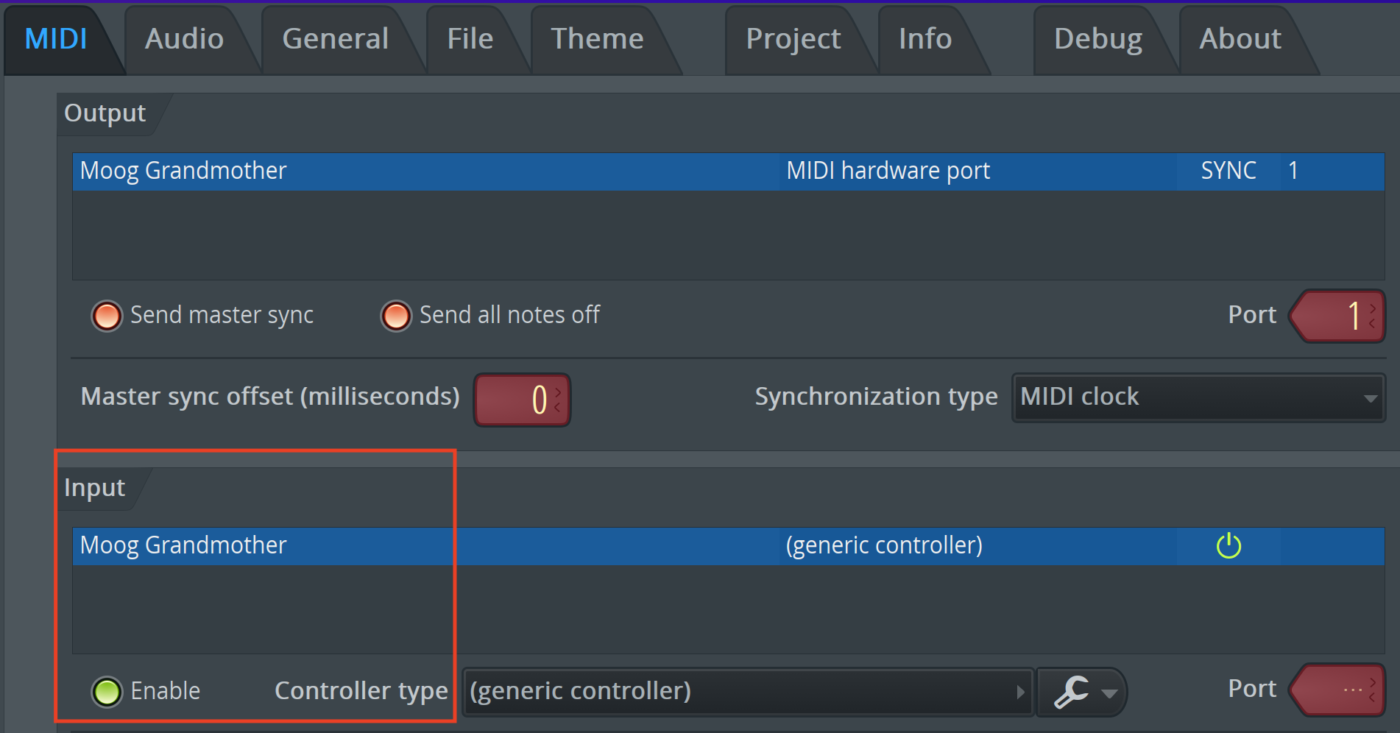
- Enable the Moog Grandmother as a MIDI device in the MIDI Input settings
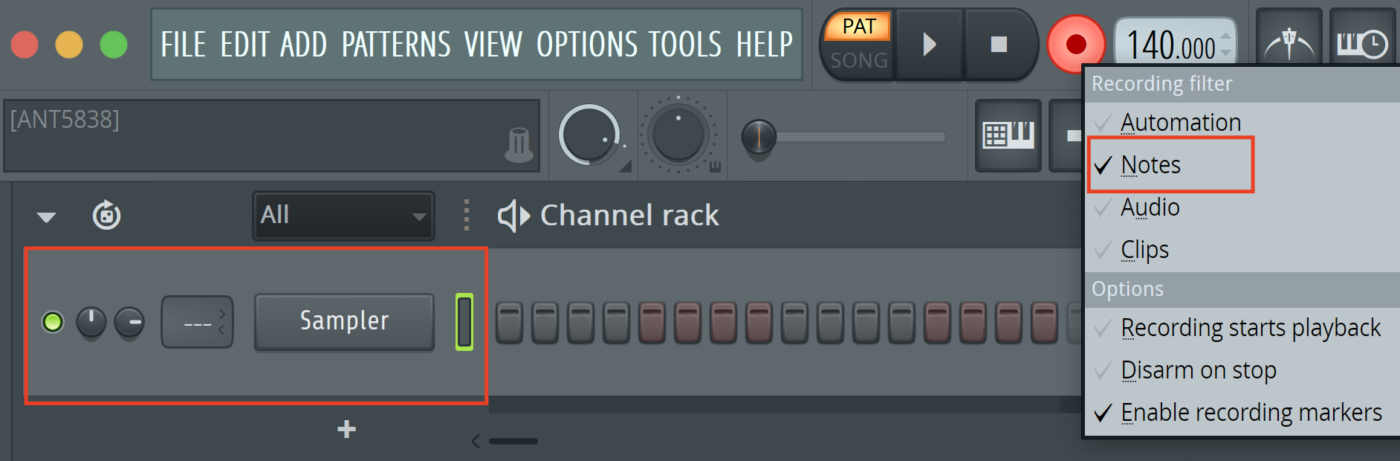
- Load an empty channel in the channel rack to store the MIDI notes
- Set recording filter in your DAW to MIDI notes
The Moog Grandmother cannot only send MIDI notes, but MIDI CC messages aswell for some parameters. You’ll find a full documentation of all MIDI CC parameters on page 43 in the manual.
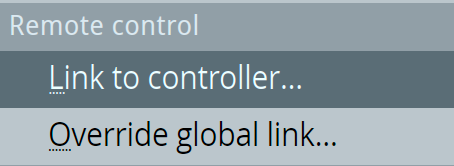
To control parameters like faders and knobs in your DAW right click them -> link to controller -> now turn a knob on the Moog Grandmother that can handle MIDI CC.
You can now control parameters in your DAW with the physical knobs on the Moog Grandmother.
Using a DAW to control the Moog Grandmother
- Enable the Moog Grandmother as a MIDI device in the MIDI Output settings
- Set a Port Number (each synth in your setup needs a dedicated port number)
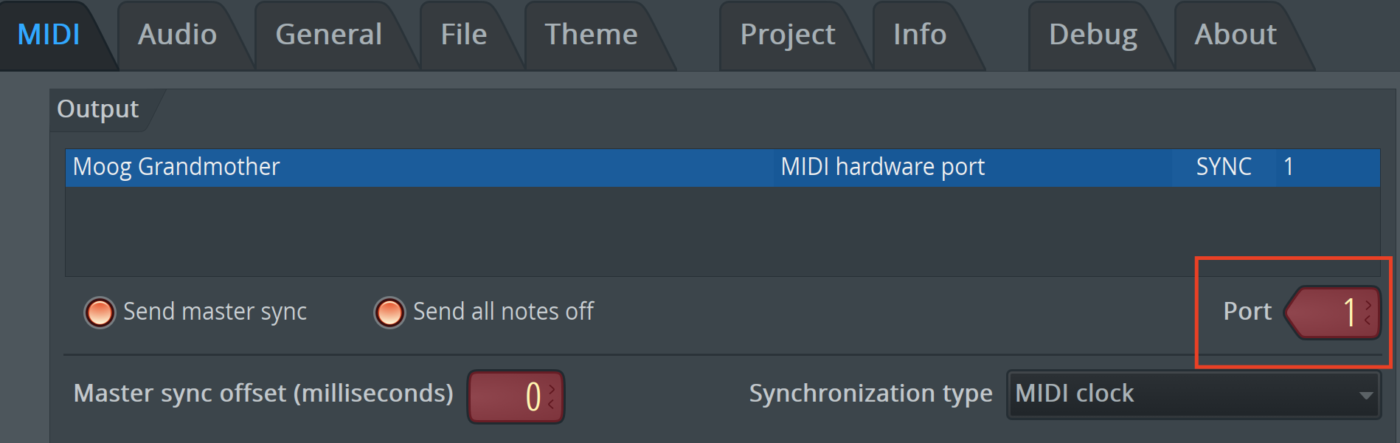
- Load MIDI Out plugin and set to the same port number
- Play notes in the piano roll of the MIDI out plugin to control the Moog Grandmother

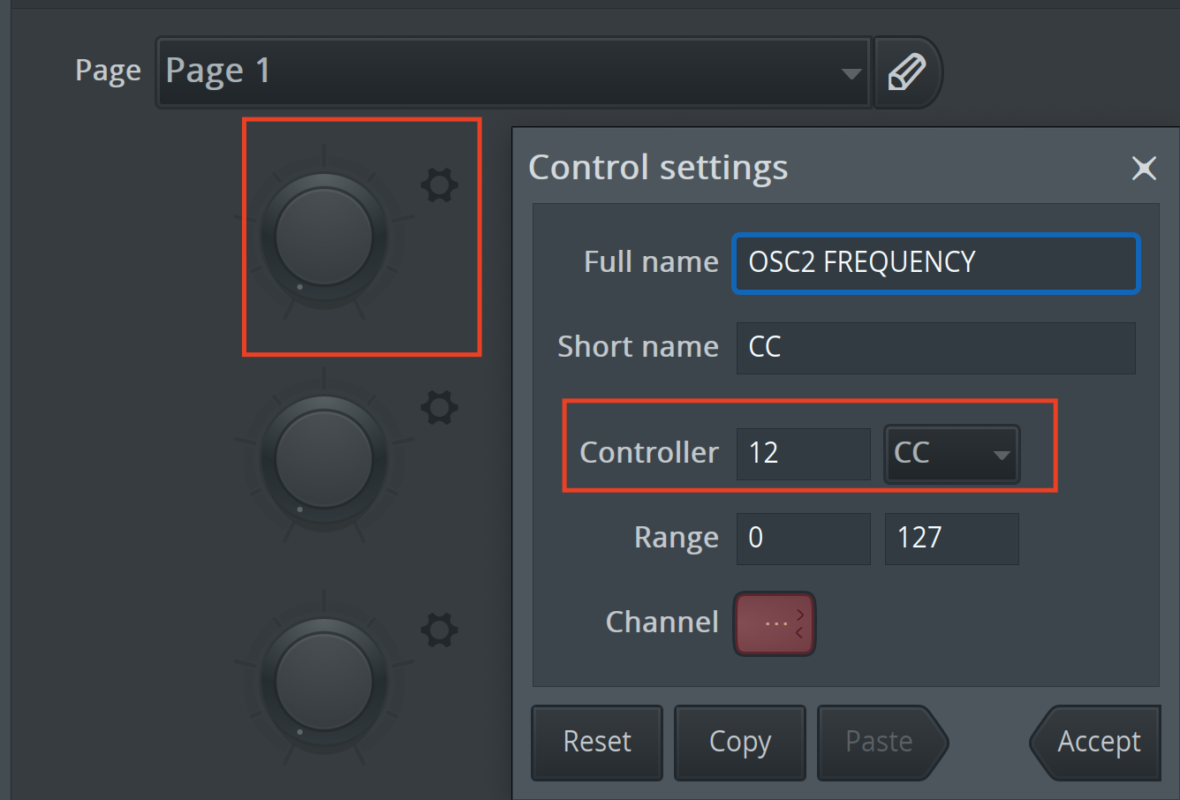
To be able to control parameters on the Moog Grandmother from inside your DAW
- Open MIDI Out plugin
- Click the ⚙️ and select MIDI CC
- Enter the corresponding MIDI CC numbers for the parameters you want to control (see documentation page 43)
- Turn the knobs inside the MIDI Out plugin to control the Moog Grandmother
Syncing the Arpeggiator and Sequencer
One of the most powerful features of the Moog Grandmother is its built-in sequencer and arpeggiator.
To sync it with your DAW:
- Open MIDI Output settings in your DAW and enable Send Master Sync

- If its not working go to the Global Settings of the Moog Grandmother and set to receive midi clock
This ensures your sequences stay perfectly in time with your project—especially useful for electronic music production.
FAQs About Connecting Moog Grandmother to a DAW
Do I Need an Audio Interface?
Yes. The Moog Grandmother does not send audio over USB, so you’ll need an interface to record its sound.
Why Can’t I Hear Anything in My DAW?
This is usually an audio routing issue. Double-check:
- Cable connections
- Input selection in your DAW
- Track monitoring settings
Can I Use It as a MIDI Controller?
Yes, you can use it send MIDI notes aswell as MIDI CC messages to your DAW. To see all parameters that can be controlled or used to control MIDI check manual page 43 (MIDI CC documentation)
How Do I Reduce Latency?
Lower your buffer size in your DAW settings. Just be careful—too low can cause glitches.
Conclusion
Learning how to connect the Moog Grandmother to a DAW is a game-changer for any producer looking to blend analog warmth with digital precision. Once you’ve set up both audio and MIDI correctly, you’ll have full control over recording, sequencing, and sound design.
The beauty of this setup is flexibility—you can jam freely on hardware while still editing and arranging inside your DAW. With a bit of practice, this hybrid workflow becomes second nature and opens the door to truly unique productions.
If you want to take things even further, explore effects processing, automation, and resampling techniques inside your DAW. That’s where the real magic happens.
Watch the full Moog Grandmother Course with 7 hours of video content and bonus download materials: